
Many people think that the squat is an exercise for athletes or serious lifters only, but this couldn’t be further from the truth, as the squat can be done by a wide variety of people with a range of goals.
All squats share a similar movement pattern in that they move a weight from a standing position via simultaneously flexing the hips, knees, and ankles during the descent, which is followed by a return to the standing position using simultaneous hip and knee extension.
The squat can be performed in a number of different ways, e.g with or without weight, using dumbbells, a barbell or machine, and with the weight being held in different positions, among many others. Common variations of the squat that use a barbell are the high bar back squat (HBBS), the low bar back squat (LBBS), and the front squat.
We will focus on the high bar and low bar back squats in this article.
What are the Muscles Worked in a Squat?
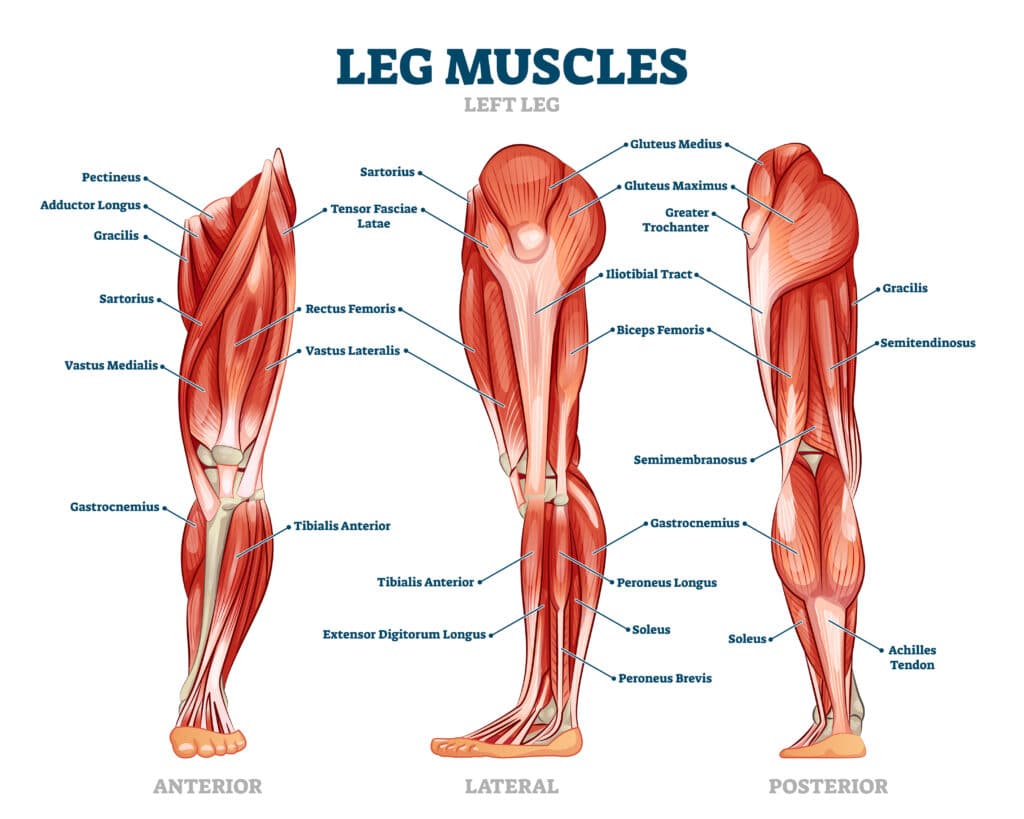
The squat loads a large amount of muscle mass including the quadriceps, hamstrings, glutes, adductors in the legs, the erector spinae in the trunk, and a number of muscles in the upper body to securely hold the bar.
The primary movers of the squat are the quadriceps muscles that act to straighten or extend the knee, whereas the glutes, hamstrings, and portions of the adductors act to straighten or extend the hip. [1] As discussed above, the muscles of the trunk, torso, and upper body are also active to transfer force from the lower body to the bar, maintain balance during the movement, and secure the bar in place on the lifter’s back.
To further explain how each of the primary movers are working during the squat, we will break up the squat into two parts, e.g. the eccentric and concentric phases.
The eccentric portion refers to the downwards phase of the squat, e.g. when the lifter is lowering themselves down towards the floor. Eccentric muscle contractions are when the muscle is getting longer lengthening while producing force against a resistance. In the squat, the hip and knee extensors are lengthening as they exert force against the bar to slow its acceleration due to gravity.
The concentric portion of the squat refers to the upwards phase, e.g. when the lifter rises to the top position of the movement. Concentric contractions are when the muscle is actively shortening while exerting force against an external object or force. On the way up the knee extensors and hip extensors are contracting concentrically to move the weight against the force of gravity.
Generally speaking, the squat and variations of the movement train the quadriceps, glutes, portions of the adductor muscle group, and hamstrings through a relatively long range of motion. This makes the squat a great exercise for training lots of muscle mass at the same time.
Accessories for Squats
Weightlifting shoes: Weightlifting shoes or “squat shoes” are the footwear of choice for many lifters. They typically feature a non-compressible sole made of a number of different materials, a strap across the top of the foot, and an elevated heel. Manufacturer’s vary as to what materials are used and how much heel elevation they build into the shoe, but most shoes are somewhere between 0.6” and 1” of heel elevation.
Together, these features make for a very stable shoe to train in. The heel elevation also changes the plane that the ankle moves through, thereby making it easier to get the knees further forward during the squat. While it doesn’t change the range of motion in the ankle, the change in angle can help some folks achieve either a more upright squat position or squat deeper.
Overall, any type of shoe is fine for squatting, but competitors and serious lifters will often squat in weightlifting shoes or flat shoes like a converse.
Wrist wraps: Wrist wraps create a support around the wrist to provide additional support. Many lifters find the compression of wrist wraps more comfortable for training and competition. If you struggle with wrist pain during the squat these can help support your wrists as you hold the barbell.
Belt: A lifting belt acts to increase intraabdominal pressure and intramuscular pressure to increase stiffness of the trunk and allow for better force transfer from the lower body to the barbell and increase the ability of the lifter to move weight.
It is possible to lift weights and get stronger without using a lifting belt, though most would be able to lift heavier weights with a belt than without. Still, most serious lifters will have a belt in their gym bag to use to get the most out of their training.
Chalk: Chalk absorbs moisture from the hands and can result in a better grip on the barbell. Lifters report that using chalk helps maintain their grip. Additionally, you may see people put chalk on the back of their shirts to help keep the bar in the same place on their back.
Knees sleeves: Knee sleeves are common also for individuals who train the squat. These are typically made of neoprene and act to warm the knee and provide minimal support. Some individuals find squatting in knee sleeves more comfortable but they are by no means required for the movement.
Spotters: While not a true gym accessory, spotters on the squat can be useful when performing challenging weights. We recommend squatting in a rack with the safeties set to just below the depth you’re squatting to, so that if you happen to have an issue standing back up you can set the bar down on the safety pins.
Using spotters can be a helpful addition at heavier weights and/or when it’s not possible to use safeties. We recommend using three spotters, with one person on each side of the barbell and one behind the lifter. Ideally, the spotters will not touch you or the barbell unless the bar is moving back down while you’re trying to stand up with it.
None of the equipment listed above is essential but it can be helpful for performance and comfort, which can help with being more consistent in the gym.
How-To Do Squats Properly
- Stand with your feet about shoulder-width apart, with your toes turned out about 15 to 30 degrees.
- Start the descent by pushing the hips back and knees both forward and out. Your torso will bend forward a little bit and become a bit more horizontal.
- Keep your feet flat on the ground and weight balanced across the entire foot during the movement.
- Keep descending lower into the squat until the crease of your hip is below the top of your knee.
- Once below parallel, you should reverse the motion by pushing up with your legs and hips, while keeping your torso tight.
- Stand up straight at the top to complete the rep. Repeat the process for each repetition.
To start, there will be significant variation to how an individual will set up for and perform the squat. The tutorial below is a great starting point for the squat. From here, we recommend making small changes over time as needed to improve performance, comfort, and/or repeatability.
For the high- and low-bar squat variations, you’ll need a squat rack and a barbell.
Setting Up the Rack
Place a barbell in the J-hooks at a height that’s just below shoulder height, approximately at the level of the mid-sternum. Ideally the bar being used is a standard power bar, e.g. a 7’ long, 20kg barbell with center knurling and a single score mark on each side. If you are between two different heights, we recommend starting at the lower height to make sure you don’t have any issues re-racking the weight and so you don’t unrack the bar on your tippy-toes.
Pro-Tip: When you unrack the bar for the first time, take a peek over at one of the j-hooks and see how much room you have between the bar and the hook. Ideally, there should be about an inch of clearance between the bottom of the bar and the top of the hook. If you have way more or less than this, we recommend adjusting the height of the hooks if possible.
Grip Width
Approach the barbell in the rack and take an overhand grip with your hands wider than shoulder width. Specifically, we recommend placing your index or middle finger on the score mark of the standard power bar, which are spaced at ~31” apart.
While maintaining this grip on the barbell in the rack, lower your body under the bar and place the bar on your back. Here we will distinguish between the high- and low-bar back squat’s different positions:
Bar Position
- For the high bar squat, place the bar on your trapezius on the thick part of the muscle just below your neck. To locate this position by hand, feel on your neck for the bony anatomical landmark called the vertebra prominens, which is the spinous process of the 7th cervical vertebrae. The bar should sit just under that.
- For the low bar squat, place the bar about an inch lower so that it’s sitting on your rear delts. To locate this position by hand, reach towards the rear, outside aspect of your shoulder and feel for the spine of the scapula. The bar should sit just under that. If you’re having difficulty finding the spine of the scapula, follow your collar bone (clavicle) outwards towards the shoulder. At its far end, it meets the acromion process, which is at the end of the spine of the scapula.
Place the bar in either the high- or low-bar positions. Both squats train the same muscles, though the torso angle in the high bar squat is typically a bit more upright and the low bar squat is a bit more horizontal. The training effects of both squat variations are similar, so this is mostly up to personal preference.
If you find that the bar position is uncomfortable to hold, you may want to adjust your grip. We are starting with a “thumb-around” grip, but you can also squat with a thumbless grip if that’s more comfortable. Alternatively, moving the grip wider or narrower may be helpful depending on your individual situation. In any case, find a position that is most comfortable for you.
Pro-Tip: While the hands are firmly gripping the barbell, they should not be bearing any of the bar’s weight. Rather, the hands are just there to trap the bar in place. We recommend feeling like you’re picking the weight up and supporting it with your body, not your arms.
Unracking the Weight
Now that the bar is in the correct position, you are ready to unrack it. You will move your feet so they are directly under your hips and shoulders. You will know the rack is at the right height if your knees and ankles are slightly flexed in this position. To take the bar out of the rack, straighten your knees and lift the bar straight up to create space between the bar and the j-hooks.
Pro-Tip: We recommend taking a deep breath and holding it before unracking the bar to help increase the stability of your trunk while it’s bearing weight. This technique is called the Valsalva maneuver increases activity of the core muscles and helps transfer force throughout the body. [2]
Walking the Weight Out
After unracking the bar and clearing the j-hooks, take two to three small steps away from the rack.You want to be far enough from the rack that you don’t hit the j-hooks on the way up but close enough that you are not expending extra energy walking around with a heavy barbell on your shoulders.
Pro-Tip: Go slow with the walk out, taking one small step on each side at a time. Similar to a basketball player’s free throw routine, the preferred walk out for an individual becomes more and more repeatable and efficient through deliberate training.
Stance Width For the Squat
The correct squat stance varies significantly between individuals and over time. To start, place your feet about shoulder-width apart, with your toes turned out about 15 to 30 degrees. With time you might find that you prefer a slightly wider or narrower stance. With this stance your toes will be turned out just a bit, this will dictate how your knees move during the rep. A narrow stance with toes pointed forward will result with knees pointing forward too. The more outward your toes are turned the more knees will point out too.
A quick note on the knees’ relationship to the toes during the squat. Most people will find that their knees will travel forward directly over or past their toes when viewed from the side. The high bar position, closer stance widths, less toe-out angle, longer femurs, and other aspects of anthropometry will all tend to produce a more “knees forward” position in the bottom of the squat.
While many claim this increases risk of injury by “loading the knee joint”, there is no evidence that performing squats this way increases the risk of knee injury or knee pain compared to other squat styles. On the contrary, humans are highly adaptable to training provided the dose of training is appropriate for the individual’s current fitness level. This video and article on injury risk are a good starting place to learn about injury risk reduction and injury in training.
Bracing During the Squat
After unracking the weight and moving into the correct stance, perform a Valsalva maneuver by taking a deep breath and holding it. By doing so, we increase intra-abdominal pressure because the diaphragm contracts and descends while breathing in, thereby reducing the space within the abdominal cavity.
We also recommend contracting your abs and your back muscles to reinforce the posture, which even further increases intra-abdominal pressure due to the additional muscular tension from abdominal wall muscles. You can do this with or without a belt.
Pro-Tip: The technical aspects of the Valsalva maneuver are sometimes confusing. Put simply, we recommend taking a big breath and holding it as if you were bracing your midsection for impact. You will hold this breath for the duration of each rep.
Initiating the Squat
You are now ready to begin the squat. Simultaneously unlock your hips and knees to initiate the descent. It may be helpful to feel like you’re pushing your hips backwards while pushing your knees forward and out.
The torso will become more horizontal relative to the floor during the descent. Put simply, you cannot squat with a perfectly vertical torso. A low bar position, shorter torso, longer femurs, and other individual differences tend to result in a more horizontal torso angle. Nevertheless, the torso should become slightly more horizontal until about halfway down, then remain more or less the same until getting about halfway up, where the torso becomes more vertical and the lifter returns to the start position with straight knees and extended hips.
Squatting to Depth
As you start out you may not know how low to go in the squat. Most people will be able to squat below parallel, though some may prefer a bit lower or higher based on their current abilities. This is also fine outside the sport of powerlifting, which requires a below-parallel squat in competition. In this context, “below-parallel” refers to lifter being viewed from the side and the crease of the hip joint being lower than the top of the knee. When the crease of the hip joint is at the same level of the top of the knee, that is called a “parallel” squat.
It should be noted that moving through larger ranges of motion in the lower body (and elsewhere) generally correlates to more muscle growth. [3]. As you are learning a new movement, it may take a few tries to achieve a below-parallel squat. For most folks, we think that aiming for a below-parallel squat should be the goal, though we admit there’s likely little difference from a health or hypertrophy perspective to squatting at parallel or just above. Similarly, we don’t think there are unique health or hypertrophy benefits from squatting well below parallel. Rather, there is a range of squat depths between just above- and well below-parallel that work generally well for improving health, function, and driving muscle growth.
From a strength perspective, we predict that the greatest improvements in strength are specific to the training performed by the individual. In other words, we’d predict that training a below-parallel squat improves below-parallel squat performance more than training to a depth of 1” above parallel or a depth of 4” below parallel. This is because strength is specific to the range of motion, joint angles, movement velocity, and contraction type. The more two movements have in common, the more likely they are to carry over to one another. This is the Specificity of Adaptation to Imposed Demand (SAID) Principle in a nutshell.
It is important to know that there is not one “correct depth” per se’, but we want to maintain a consistent range of motion over time to ensure progress. If someone adds weight to the squat, but reduces the range of motion, it’s unclear whether or not they actually got stronger or if they just changed the movement. Some people may find it beneficial to learn the squat by temporarily using a physical marker (box or bench) that you make contact with your glutes at the bottom of the rep.
Pro-Tip: If you are recording your lifts and watching the bar path, it is most efficient if the bar path is vertical when viewed from the side. If you have a barbell that is lopsided when viewed from the front, this is not a concern.
Re-racking the Weight
Once you have completed the desired number of reps and you have returned to a full standing position, l walk the bar straight back into the rack and make contact between the barbell and the uprights. Once you can feel both uprights against the barbell you can lower it down into the j-hooks. This prevents you from missing a j-hook as you lower the bar.
How To Troubleshoot Your Squat
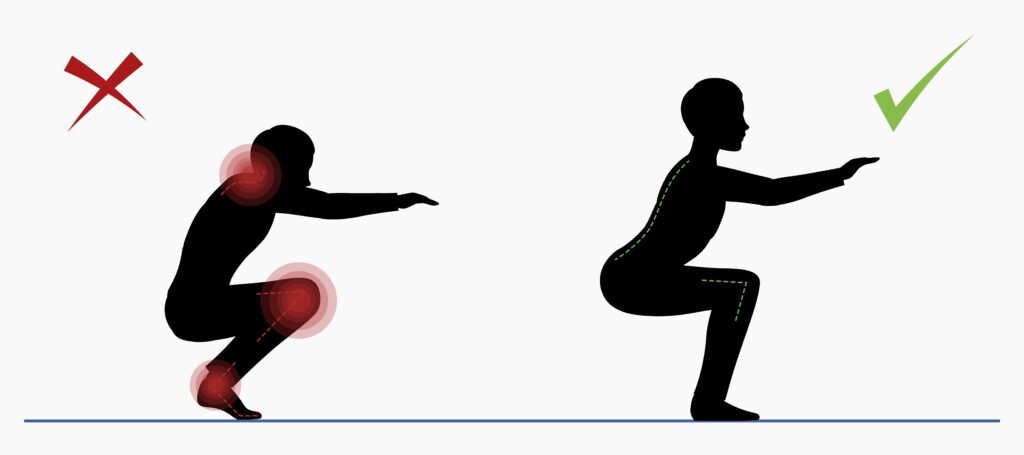
There are a number of mistakes that frequently occur in the squat. We recommend using a phone or small recording device in your gym to assess your technique. While a specific squat form is not correlated with injury or pain, the goal is to generate a repeatable and efficient movement pattern to maximize the results from training.
Each of the following items is an opportunity to improve performance in the squat:
Bar Rolling
Movement of the barbell forward or backwards relative to the balance point- the middle of the foot- can happen if the thoracic spine (upper back) is moving a lot during the rep. This is sometimes accompanied with the bar rolling up or down your back during the rep.
Pro-Tip: First, make sure the bar is in the right position and not too high or too low relative to the type of squat you’re trying to do. Oftentimes, a bar that is too high will roll up and a bar that is too low will roll down. People can also affect the bar’s position by inappropriately elevating their elbows up during the squat. We recommend keeping the elbows down and tucked into the sides of the torso during each repetition. Barring a bar position or elbow problem, check out the following video for how-to keep your thoracic spine tight during the squat.
Chest Falling in the Squat
Whether it’s a high bar, low bar, front, or even overhead squat, the hips are going to rise at a slightly faster rate than the chest and shoulders during a heavy squat. Practically speaking, this means that the torso tends to become slightly more horizontal during the ascent, though we should aim to fight against this.
If the hips rise too quickly relative to the shoulders – sometimes called a “good morning” squat- lifters tend to be in a mechanically disadvantageous position and there’s a tendency for the barbell to get forward of the balance point. This squat style is less efficient than it could be and we would advise trying to correct it to improve performance.
Pro-Tip: When you come up out of the hole in the squat, be sure that you’re not inadvertently driving the hips backwards. Instead, think about using “leg drive” to drive the hips, torso, and chest straight up. Another cue that may be useful is to “lead with the chest” out of the bottom, e.g. aim to move upwards first with the chest and shoulders as if you have a string attached to your sternum and that string is pulling you up out of the hole. If neither of these work for you, consider initiating the squat with a “knees forward first” cue to change how you get to the bottom of the squat. When lifters don’t have enough forward knee travel during the descent, there’s often some forward momentum of the bar and lifter at the bottom, which the body reacts to by shifting everything backwards on the way up, thereby creating a more horizontal torso angle.
Heels or Toes Coming Up During the Squat
When watching a squat, a good coach will take a peek at the feet to see if the toes or heels are coming up at any point during the rep. If the toes come up during the rep, the weight is too far back. Similarly, the heels coming up during the rep signifies that the weight is too far forward relative to the balance point. Both represent an opportunity to improve efficiency, as we want the weight to remain relatively centered over the midfoot.
Pro-Tip: For weight shifting onto the heels (e.g. toes up), we recommend cueing yourself to keep your knees forward during the squat. For weight shifting onto the toes (e.g. heels up), we recommend cueing yourself to keep your hips back more during the lift. Overcorrecting can sometimes be useful, e.g. lifting the big toe prior to the descent if your heels are coming up, or deliberately pushing your big toe down to start the movement if your toes are coming up.
Improving Depth
There are a number of reasons why an individual may have issues with achieving a below parallel squat:
- Awareness– Sometimes people are not aware that they’re squatting above parallel and simply asking them to go lower works just fine. If trying this, we recommend reducing the weight being used to ensure the load isn’t too heavy at the new, lower depth.
- Too vertical of a torso– Some people will attempt to squat with a perfectly vertical torso, which is incompatible with a below-parallel squat. Outside of the cue “lean forward more” during the descent, doing a few goblet squats where a dumbbell is held in the arms against the sternum can help people feel the correct amount of forward inclination.
- Incorrect stance– Too wide and too narrow of a stance make it hard to squat below parallel. To verify your stance width, we recommend doing a bodyweight squat first with your feet approximately shoulder width apart and toes slightly turned out. Try playing around with slightly wider or narrower stances to find what feels the most comfortable and repeatable for you. Holding onto the side of a rack or other sturdy object can help you squat lower to check stance width without requiring as much muscular strength.
- Knees caving in- If the knees aren’t pushed out to the side, many people will feel their upper thigh contact their abdomen, signifying they’re as low as they can go. By pushing the knees out to the side more, we can create room to squat “in between” the legs.
- Lack of strength– If someone can squat below parallel with their feet flat on the floor and maintain balance, but cannot do so with a barbell on their back, the weight may be too challenging. In this instance, doing a goblet squat, a barbell squat to above parallel, a leg press, or other exercise may be necessary to develop the strength to squat with a barbell. Alternatively, a lighter training bar can be used if available.
Overall, we think most people should be able to squat to parallel or slightly below. We acknowledge that barbell sports like powerlifting, Olympic weightlifting, CrossFit, and so on each have their own sports-specific demands for squat depth. Outside of that, we’re really looking for a repeatable and efficient technique that gets the lifter close to parallel or just below, if possible. Squatting above parallel is certainly better than not squatting at all though!
What are the Benefits of Squatting?
Increase in Physical Strength
Like other resistance training exercises, the squat improves muscular strength in many muscles, as it is a compound or multi-joint exercise that can be loaded heavily. However, when we think of muscle strength, we shouldn’t only consider what a muscle can do in the gym. For example, strength training has been shown to improve power, endurance, and speed as well. [4.5]
Improved Health
From a health perspective resistance training can help promote a healthy lifestyle, maintain independence and quality of life throughout your lifetime. Specifically, resistance training can be correlated with decreased risk of injury, improved bone and muscle strength, and improved blood pressure. [6-8]
Strength training can also reduce joint pain from osteoarthritis, one of the most common disabling conditions related to joint pain. By producing clinically significant improvements in muscle strength, functional ability, and pain scores in patients, strength training should be a part of nearly everyone’s exercise routine.[9]
Improved Mental Health
Regular strength training has been proven to reduce the risks or symptoms of disorders like depression and anxiety. These effects seem to occur with regular participation, though the size of the effect is not really tied to how strong individuals get. [10,11]
Should You Squat?
The squat is a great way to build muscle in your lower body, particularly the glutes, thighs (quadriceps), and hamstrings. As you are getting started, don’t worry about being perfect. The squat has some technical details and personal preferences to work out. Don’t be afraid to try different stance widths, grip widths, or equipment as you find what works best for you. There isn’t one perfect squat or style. Find what works for you and is repeatable week after week.
References:
- Yavuz HU, Erdag D. Kinematic and Electromyographic Activity Changes during Back Squat with Submaximal and Maximal Loading. Appl Bionics Biomech. 2017;2017:9084725. doi: 10.1155/2017/9084725. Epub 2017 May 4. PMID: 28546738; PMCID: PMC5435978.
- Hemborg B, Moritz U, Löwing H. Intra-abdominal pressure and trunk muscle activity during lifting. IV. The causal factors of the intra-abdominal pressure rise. Scand J Rehabil Med. 1985;17(1):25-38. PMID: 3159082.
- Schoenfeld BJ, Grgic J. Effects of range of motion on muscle development during resistance training interventions: A systematic review. SAGE Open Med. 2020 Jan 21;8:2050312120901559. doi: 10.1177/2050312120901559. PMID: 32030125; PMCID: PMC6977096.
- Andersen V, Prieske O, Stien N, Cumming K, Solstad TEJ, Paulsen G, van den Tillaar R, Pedersen H, Saeterbakken AH. Comparing the effects of variable and traditional resistance training on maximal strength and muscle power in healthy adults: A systematic review and meta-analysis. J Sci Med Sport. 2022 Dec;25(12):1023-1032. doi: 10.1016/j.jsams.2022.08.009. Epub 2022 Aug 28. PMID: 36130847.
- Balabinis CP, Psarakis CH, Moukas M, Vassiliou MP, Behrakis PK. Early phase changes by concurrent endurance and strength training. J Strength Cond Res. 2003 May;17(2):393-401. doi: 10.1519/1533-4287(2003)017<0393:epcbce>2.0.co;2. PMID: 12741884.
- O’Bryan, Steven J et al. “Progressive Resistance Training for Concomitant Increases in Muscle Strength and Bone Mineral Density in Older Adults: A Systematic Review and Meta-Analysis.” Sports medicine (Auckland, N.Z.) vol. 52,8 (2022): 1939-1960. doi:10.1007/s40279-022-01675-2
- Cornelissen, Véronique A et al. “Impact of resistance training on blood pressure and other cardiovascular risk factors: a meta-analysis of randomized, controlled trials.” Hypertension (Dallas, Tex. : 1979) vol. 58,5 (2011): 950-8. doi:10.1161/HYPERTENSIONAHA.111.177071
- Lauersen, Jeppe Bo et al. “The effectiveness of exercise interventions to prevent sports injuries: a systematic review and meta-analysis of randomised controlled trials.” British journal of sports medicine vol. 48,11 (2014): 871-7. doi:10.1136/bjsports-2013-092538
- Turner MN, Hernandez DO, Cade W, Emerson CP, Reynolds JM, Best TM. The Role of Resistance Training Dosing on Pain and Physical Function in Individuals With Knee Osteoarthritis: A Systematic Review. Sports Health. 2020 Mar/Apr;12(2):200-206. doi: 10.1177/1941738119887183. Epub 2019 Dec 18. PMID: 31850826; PMCID: PMC7040944..
- Gordon BR, McDowell CP, Lyons M, Herring MP. The Effects of Resistance Exercise Training on Anxiety: A Meta-Analysis and Meta-Regression Analysis of Randomized Controlled Trials. Sports Med. 2017 Dec;47(12):2521-2532. doi: 10.1007/s40279-017-0769-0. PMID: 28819746.
- Gordon BR, McDowell CP, Hallgren M, Meyer JD, Lyons M, Herring MP. Association of Efficacy of Resistance Exercise Training With Depressive Symptoms: Meta-analysis and Meta-regression Analysis of Randomized Clinical Trials. JAMA Psychiatry. 2018 Jun 1;75(6):566-576. doi: 10.1001/jamapsychiatry.2018.0572. PMID: 29800984; PMCID: