Lifters and exercise enthusiasts often focus on their glutes and hamstrings on leg days. As they should — the glutes and hamstrings are two of the most important muscle groups in our lower bodies. They are the foremost force producers for locomotion in our bodies, and they are the muscles that allow us to stand, run, and jump. As such, these muscles play a crucial role in our day-to-day lives and athletic performance.
In this article, we will go over our 8 favorite glute and hamstring exercises. We recommend choosing a total of 4 to 5 exercises, e.g. one primary, two secondary, and one to two tertiary exercises to perform each week. These can be done on a “glute and hamstring” day if you prefer a body part split, or spread out over the week if you prefer to use a full-body training split. We will also delve into glute and hamstring anatomy as well as share some tips on how to get the most out of your training and do so safely.
What are the Best Glute and Hamstring Exercises?
Here’s an outline of the exercises we will go over today:
- Squats: 3 to 4 sets of 4 to 6 repetitions
- Deadlifts: 3 to 4 sets of 4 to 6 repetitions
- Hip Thrusts: 3-4 sets of 6 to 10 repetitions
- Romanian Deadlifts: 3 to 4 sets of 6 to 10 repetitions
- Step-up: 2 to 4 sets of 8 to 12 repetitions per leg
- Split Squat: 2 to 4 sets of 10 to 15 repetitions per leg
- Hamstring Curls: 2 to 4 sets of 10 to 15 repetitions
- Hip Extensions: 2 to 4 sets of 10 to 20 repetitions
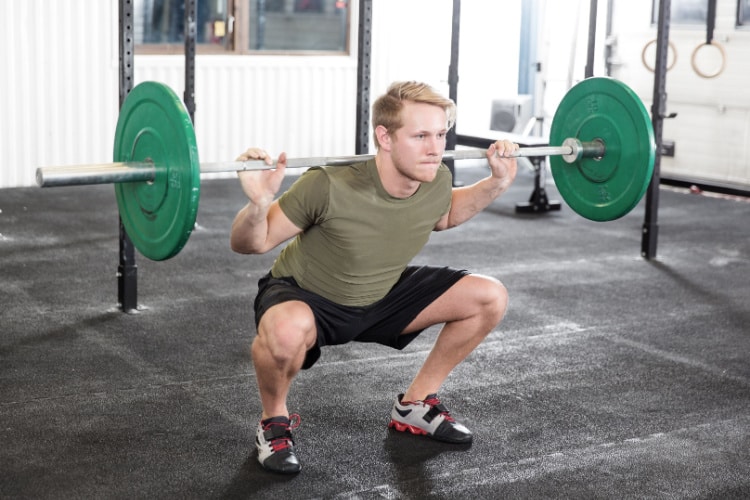
1. Squats
- Movement Category: Primary
- Programming: 3 to 4 sets of 4 to 6 repetitions
- Weight: Use a weight that leaves you 2 to 3 repetitions short of failure, e.g. RPE 7 to 8.
Squats are a dynamic strength training exercise that trains multiple muscles together, including the glutes, quadriceps, hamstrings, adductors, hip flexors, calves, and core (e.g. lower back and abs). While there are many different ways to do a squat, they pretty much all train the muscles of the lower body and trunk more or less equally, with little difference in potential hypertrophy or general strength.
In addition to strengthening the lower body and core and generating a potent hypertrophy response, squats also seem to carry over all to sport, with data showing a correlation between squat training and improved overall athletic performance. [1] They’re also versatile in that they can be done at home, with minimal equipment, or loaded heavy with a barbell to improve maximal strength. This time around, we’ll focus on the back squat to train for strength and size.
To do squats:
- The correct squat stance varies significantly between individuals and over time. To start, place your feet about shoulder-width apart, with your toes turned out about 15 to 30 degrees.
- Using a barbell in a squat rack that’s set at approximately mid-sternum height, grab the bar with an overhand grip, with your index finger around the score or “power” rings on each side of the barbell.
- Move under the bar and place it on your upper back, making sure the center knurling of the barbell is centered on your back. Bar placement can be in one of two general positions:
- High Bar — the bar is placed above the spine of the scapula, resting relatively high on the trapezius muscles.
- Low Bar — the bar is placed below the spine of the scapula, resting lower on the trapezius muscles and rear delts.
- Both squats train the same muscles, though the torso angle in the high bar squat is typically a bit more upright and the low bar squat is a bit more horizontal. The training effects of both squat variations are similar, so this is mostly up to personal preference.
- With the bar in the correct position, lift the bar up off the J-hooks, bearing the load mostly on your back with your chest up. Keep your elbows down, tucked into your sides.
- Take 1-step back from the hooks with each leg, adjusting each foot into the stance described in the first step of this series.
- Take a big breath in and hold it, squeezing your midsection tight. Now you can start your descent by pushing your hips back and knees both forward and out. Your torso will bend forward a little bit and become a bit more horizontal. This is fine.
- Keep descending lower into the squat until the crease of your hip is below the top of your knee. This is a below-parallel squat.
- Once below parallel, you should reverse the motion by pushing up with your legs and hips, while keeping your torso tight (and breath held).
- Stand up straight at the top to complete the rep. Repeat the process for each repetition.
For depth, most people will be able to squat below parallel, though some may prefer a bit lower or higher based on their current abilities. This is also fine outside the sport of powerlifting, which requires a below-parallel squat in competition. For a video tutorial on how to squat, check out this video.
2. Deadlifts
- Movement Category: Primary
- Programming: 3 to 4 sets of 4 to 6 repetitions
- Weight: Use a weight that leaves you 2 to 3 repetitions short of failure, e.g. RPE 7 to 8.
The deadlift is another full-body exercise, recruiting muscles in both the lower and upper body to lift the weight. Specifically, the deadlift requires the quadriceps, glutes, adductor magnus, and hamstrings to produce force, which is transferred through the core, the spinal erectors, the muscles of the back such as the latissimus dorsi and trapezius, and then ultimately into the lifter’s hands that are gripping the bar. [2]
Deadlifts use different mechanics than the squat, as there is more hip flexion and less knee flexion in a deadlift compared to a squat. [3] The deadlift also starts with a concentric (e.g. muscle shortening) contraction, whereas the squat starts with an eccentric (e.g. muscle lengthening) contraction.
Deadlifts can be done several different ways using different stances (sumo vs. conventional), implements (barbell vs. trap bar), ranges of motion (rack pull vs. from the floor), and so on. We’ll cover another deadlift variation, the Romanian deadlift, a little later in the article. This time around though, we’ll focus on the conventional deadlift to train for strength and size.
To start, you’ll need a barbell at the appropriate height. A standard 45-pound or 20-kg plate is 450mm in diameter, which spaces the bar ~225mm off the ground. If this is your first time deadlifting, we recommend using a lighter weight but maintaining the appropriate height of the bar using mats under the plate or the safeties in the rack in such a way that the bar is about mid-shin level. Using smaller diameter plates and deadlifting from the ground makes the exercise more difficult due to the added range of motion. While it’s possible to deadlift this way, we recommend learning how to deadlift from the more traditional height. To do a conventional deadlift with a barbell and weights:
- Approach the barbell until your shins are about 1” away while standing up straight.
- Take a stance where your feet are about hip-width apart, toes slightly turned outward approximately 5 to 15 degrees.
- Bend over at the waist while keeping your knees mostly straight and grab the barbell with a double overhand grip, placing your hands just outside your legs. Your index finger should be where the smooth center section meets the knurling.
- From here, push your knees forward until your shins touch the barbell, but do not move the barbell with your legs.
- Push your knees out to the sides. They should be touching the inside of your arms at the elbow joint.
- Squeeze your chest up towards the ceiling and look out to a spot on the floor ~ 6 to 10 feet in front of you.
- Take a big breath in and hold it, then drag the bar up your legs, making sure to keep the bar in contact with your legs the entire time.
- Stand up straight at the top, making sure to not lean back.
- Lower the weight back to the starting position.
For a video tutorial on how to deadlift, check out this video. For grip considerations, check out our article on the grip problem.
3. Hip Thrusts
- Movement Category: Secondary
- Programming: 3-4 sets of 6 to 10 repetitions.
- Weight: Use a weight that leaves you 2 to 3 repetitions short of failure, e.g. RPE 7 to 8.
Hip thrusts are a glute bridge variation that is performed with barbells or a machine. As it can be loaded with weights, the hip thrust can be very useful for improving hip extension strength and power as well as the size of the hip extensors, namely the gluteus maximus. [4,5]
While they mostly target the glutes, hip thrusts are also a great compound workout for training the lower body in general, as they have the additional benefits of activating the hamstrings and parts of the adductor muscle group without placing much load on the lower back. For those currently dealing with pain or sensitivity in the lower back, hip thrusts may be a good entry point for returning to exercise. For others looking to add more lower-body training volume, the hip thrust is a great addition to squats or deadlifts for training the posterior chain.
Hip thrusts can be performed with a stand-alone machine or with a barbell, a pad, and a bench. The setup for the machine version is minimal compared to the barbell version, but the execution of the exercise is the same for both.
To do hip thrusts:
- Sit on the floor near a bench, knees bent, with your upper back resting on the bench. Your feet should be a bit wider than hip-distance apart, with your toes slightly turned out.
- Place the bar over a pad across the hips and hold onto it with an overhand grip. Do not use your arms to try and lift the bar. Instead, use your arms to secure the bar into this starting position.
- Take a deep breath and hold it, squeezing your midsection tight. Push through your legs to lift your hips up towards the ceiling until your body is in reverse tabletop position. Squeeze your glutes at the top of the movement. Keep your head still, with your chin should be slightly tucked throughout.
- Lower down your body slowly and with control until your hips are just a few inches off the floor. Repeat the movements.
While pressing, imagine that you are pushing the ground away from you using your feet.
4. Romanian Deadlifts
- Movement Category: Secondary
- Programming: 3 to 4 sets of 6 to 10 repetitions.
- Weight: Use a weight that leaves you 2 to 3 repetitions short of failure, e.g. RPE 7 to 8.
Romanian deadlifts or “RDLs” are a deadlift variation that starts at the top and uses a slightly shorter range of motion than the regular deadlift. Due to the differences in mechanics, particularly the focus on the eccentric or “downward” phase of the lift, RDLs are a great variation to train the hamstrings, glutes, and erectors for both strength and size. [6] Additionally, because of the similarity between the RDL and the conventional deadlift, RDLs seem to have a pretty good carryover for improving deadlift strength.
RDLs can be done by walking a loaded barbell out of the j-hooks in a rack to start from the top or from the floor, where the lifter initially lifts the weight into the starting position like a traditional deadlift. In both cases, here is how to perform a Romanian deadlift:
- Your grip should be a double overhand grip — your hands should be placed just outside your legs. Your index finger should be where the smooth center section meets the knurling. Wrist straps may be used as well.
- Take a stance where your feet are about hip-width apart, toes slightly turned outward approximately 5 to 15 degrees.
- Deadlift the weight from the floor or lift it out of a rack, where the bar is set to approximately mid-thigh height.
- From the top position of the deadlift, puff your chest out proudly and look out to a spot on the floor ~ 6 to 10 feet in front of you. Take a big breath in and hold it.
- Now, push your hips back and slowly lower the bar down your legs, making sure the bar stays in contact with your legs.
- As the bar traces your legs downward, your knees should also bend as the bar goes past them.
- Keep lowering down until the bar is below your knees, approximately mid-shin level.
- From here, reverse the motion and deadlift the bar back up to lockout, again keeping the bar in contact with your legs the whole time.
Romanian deadlifts should not be done with locked knees or even straight legs, as that’s another variation called a stiff-legged deadlift. Rather, the RDL has the same mechanics as a regular deadlift, but in reverse. This means that as the bar comes down your legs, both your hips and knees will bend. On the way up, the lift is effectively the same as a conventional deadlift, albeit from the middle of the shin instead of the floor.
5. Step-up
- Movement Category: Tertiary
- Programming: 2 to 4 sets of 8 to 12 repetitions per leg
- Weight: Use a weight that leaves you 2 to 3 repetitions short of failure, e.g. RPE 7 to 8.
Step-ups are a compound exercise that mainly targets muscles in the quadriceps, glutes, and hamstrings. While they’re a compound exercise using multiple joints and loading multiple muscle groups at once, step-ups are particularly effective in glute activation. In fact, they have been proven to have similar levels of muscle excitation as many other lower-body compound exercises, including squats, deadlifts, and hip thrusts, along with their variations. [7]
Although they can be done without any weights, most will need to use additional loads by doing step-ups with dumbbells, ankle weights, or a weighted vest to get near muscular failure in the 8 to 12 repetition range. Step-ups require an elevated surface, ideally somewhere a few inches below knee level to start. As your fitness improves, adding load and elevation to knee-level height is recommended. Make sure the surface you’re stepping onto is stable and sturdy.
To do step-ups with dumbbells:
- Stand up straight in front of a bench (or any other elevated surface) with your arms at your sides holding dumbbells.
- Place your dominant foot on a box that’s a few inches lower than your knee. This should create about a 90-degree angle in your knee and a slightly smaller one in your hip. Your torso should be slightly inclined for balance purposes and your trail foot should not be bearing much weight.
- Push up on your lead leg until it’s straightened out. You may step on the box with your trail foot for balance.
- At the top of the movement, pause for a second before lowering yourself to the starting position.
- Execute the movement for the recommended repetitions for your dominant leg, then switch over and repeat the exercise for the other leg.
Step-ups require a good amount of core activation to transfer force from the legs to the upper body, so make sure that you keep your trunk tight. Also make sure that your spine only inclines a modest amount. Try to place as much load on the lead leg as possible. As your fitness improves, increase the height and/or loading.
6. Split Squats
- Movement Category: Tertiary
- Programming: 2 to 4 sets of 10 to 15 repetitions per leg
- Weight: Use a weight that leaves you 2 to 3 repetitions short of failure, e.g. RPE 7 to 8.
The split squat is a compound exercise that mainly targets the quadriceps, glutes, adductors, and hamstrings. Much like step-ups, split squats are great for loading each leg independently.
Due to the high degree of balance required to do split squats, some may choose to use a Smith machine or use one hand on a sturdy object like a power rack or nearby machine if hypertrophy is the priority. Those looking to improve unilateral strength and performance, on the other hand, may choose to embrace the balance challenge. The exercise is also extremely efficient in improving balance and can be great for training the hip extensors, as it engages them more than regular squats.
Split squats share similar mechanics to lunges, and much like lunges, they can be done with or without weights. However, these two exercises are not the same — split squats are stationary, or in other words, they’re down without any forward or backward motion, whereas lunges tend to involve a step forward and back with traditional lunges, a step back and then forward with reverse lunges, or continued steps forward with walking lunges.
As a final consideration for technique, changing the angle of the torso tends to change how the muscles are loaded. With a greater forward lean at the hip, the glutes and hamstrings tend to be loaded more than when the torso is kept vertical, which tends to load the quadriceps and glutes. Subtle differences probably don’t matter too much, but we think a modest forward lean is an acceptable compromise between the two extremes.
To do split squats:
- Start by standing straight with your feet hip-width apart, with your hands at your sides (holding dumbbells if needed to meet the rep and RPE prescription)
- Take a large step forward as if you’re doing a lunge, making sure your feet are still placed hip-width apart. Your knees should be slightly bent and your ankles, knees, and feet should be in a single line when looked at from the front. This is your starting position.
- Slowly lower yourself to the ground by letting your front knee go forward towards the toe and dropping your back knee slowly towards the ground. Your torso should be leaning slightly forward as your knee descends towards the ground, which it should eventually touch under control.
- Start pushing back up to the starting position while aiming to maintain your torso’s angle through the range of motion.
Perform all the reps on one side before moving to the other side. You can take 1-2 minutes of rest between sides if you need it, or do both sides back-to-back and then take a longer rest period of 2 to 3 minutes. Either way works!
7. Hamstring Curls
- Movement Category: Tertiary
- Programming: 2 to 4 sets of 10 to 15 repetitions
- Weight: Use a weight that leaves you 1 to 2 repetitions short of failure, e.g. RPE 8 to 9
The hamstring curl is an isolation exercise that targets the back of the leg, specifically the hamstrings and, to a lesser degree, the glutes.
Hamstring curls can be done without equipment, e.g. lying face down with a dumbbell held between the feet for resistance or with resistance bands anchored to a nearby rack and looped around the ankles. They can also be done with a machine, of which there are many variations, e.g. seated, standing, or lying face down. While all of these variations will produce similar results, today, we will focus on the seated hamstring curl, as it has been shown to produce great results for muscle hypertrophy. [10]
To do hamstring curls:
- Sit on the leg curl machine with your legs extended out in front of you. Your ankles should be resting on the pad. Try to keep your legs as straight as possible. This is your starting position.
- Contract your hamstring muscles by pulling down into the pad to press the bar as far down as it will go. Hold the position for a second.
- Reverse the motion under control, allowing for the largest range of motion that’s just short of the machine coming to rest on the stops again. Hold this position for a second. That’s 1 rep.
- Try to keep your movements as slow and controlled as possible.
With this movement, try to make every rep controlled and deliberate, aiming to squeeze your hamstrings as you go through the range of motion. Avoid swinging and using momentum to do each rep.
8. Hip Extensions
- Movement Category: Tertiary
- Programming: 2 to 4 sets of 10 to 20 repetitions
- Weight: Use bodyweight or added weight that leaves you 2 to 3 repetitions short of failure, e.g. RPE 7 to 8
The final item on our list is both an exercise and an action at the hip joint, e.g. when the angle between the hip and the thigh increases to become straight. This means that there isn’t only one exercise that results in a hip extension, but many!
In fact, glute bridges, hip thrusts, and standing kickbacks are all technically hip extension exercises. While all these movements train hip extension and the muscles involved in doing this movement, we can isolate the muscles and the movement by using a back extension bench or hip extension machine.
The hip or “back extension” exercise is useful for additional hypertrophy and strength stimulus that doesn’t add a lot of fatigue to the other muscles typically involved in a hip extension. Rather, it tends to focus most of the training effects on the glutes, spinal erectors, and hamstrings. Targeting these muscles in a low-skill, low-load way can be useful in helping those with low back sensitivity, for example. [11]
To do hip extensions on a 45-degree back extension bench:
- Adjust the pad to just below the level of the hips when standing on the footplate with legs straight.
- Extend the torso to be straight in line with the legs by extending the back and hips. This is your starting position.
- Fold forward at the hips slowly, going forward and down as low as you can go.
- From here, squeeze your glutes to extend your hip and return to the start position.
If doing these with body weight only, we recommend placing your hands across your chest or behind your head. If you need to add a load, we recommend holding a dumbbell or plate behind you on your shoulders. Holding the weight in front against your chest is also an option, but the leverage of the lower body is pretty good with the weight in this position, making the weights used much heavier than if they’re behind the head.
How to Choose the Right Exercises
It’s good to remember that there is no best exercise that universally trains the hamstrings or glutes better than others for all individuals. Individual results to a given exercise and even program will vary wildly. Despite wide-ranging results amongst individuals, it’s not uncommon to see claims like “hip thrusts are the best exercise for muscle hypertrophy in the glutes.” These claims are generally supported by EMG studies, which measure muscle excitation.
However, muscle excitation doesn’t correlate well with strength and hypertrophy results, as it has no direct relation to increased levels of muscle protein synthesis, which is the phenomenon that needs to occur for muscular development to happen. We also don’t have data showing that higher levels of muscle excitation necessarily lead to higher levels of hypertrophy. In short, modestly higher EMG levels of one exercise in a given muscle group are not particularly convincing that there’s likely to be increased muscular development compared to another exercise. [12]
Our recommendation would be to train using a variety of exercises that target the same muscle groups in different ways. Doing exercises with different ranges of motion and repetition schemes may provide the best results.
That’s all on the best exercises you can do to increase strength and muscle mass in your glutes and hamstrings, but we’re still far from done.
We couldn’t wrap up an article about training your glutes and hamstrings without mentioning a few things about these muscles. So, in the following section, we will look into the muscular anatomy of the glutes and hamstrings.
The Glute and Hamstring Anatomy
Training the glutes and hamstrings together is quite common and generally easy since a majority of compound lower body exercises will target both muscles together as synergists. To allow for a better understanding of these muscle groups and the relationship between them, we’ll take a closer look at both — starting with the glutes.
The glutes, also known as the gluteal muscles, is a muscle group that is located in the buttocks. It consists of three different muscles; the gluteus maximus, gluteus medius and gluteus minimus. The gluteus maximus, a thick, quadrangular muscle that stretches out across the buttocks, is the largest and most superficial of the three, giving the buttocks their size, shape, and form. [13] The gluteus medius is the second largest, and, along with the gluteus minimus, it’s positioned under the gluteus maximus.
The glutes have the main function of stabilizing the upper body and pelvis. They also serve to help locomotion and hip extension, which allow us to perform movements such as walking, running, and climbing stairs. The gluteus maximus is the most powerful hip extensor in our bodies, being the primary mover in activities that require us to jump, sprint, and perform lots of other explosive athletic movements. [14]
The gluteus medius and minimus stabilize our pelvis and are involved in other movements of the hip such as abduction, internal rotation, and keeping the torso vertical when supported by only one leg.
The second muscle group we will explore today is the hamstrings. As a group, they are made up of multiple long muscles that stretch from the bottom of our hip to just beyond our knee joints, the semitendinosus, semimembranosus, and the short and long heads of the biceps femoris. The semitendinosus and the semimembranosus are relatively smaller than the biceps femoris and have the main functions aiding hip extensions, knee flexions, and the internal rotation of the knees when they are flexed. The biceps femoris is the bigger muscle of the group, and while it mainly does the same things as the semitendinosus and semimembranosus muscles, it also participates in hip extension as well as in externally rotating the lower leg when the knee is flexed.
It’s clear that our glutes and hamstrings do a lot of work. They’re two of the main muscle groups that help us move our legs, giving us the ability to carry out day-to-day activities. So, if you’re aiming to improve their function, size, or even shape, you’ve got to train them appropriately and, most importantly — safely. In the following section, we’ll tell you how to do it right.
Safety Precautions to Prevent Injury
The risk of injury to the glutes, hamstrings, or elsewhere from exercise is relatively small. On average, most forms of resistance training have an injury rate of 2 to 4 injuries/1000 hours. [16] The majority of injuries observed in resistance training are not catastrophic, in that they do not require specialized care and spontaneously resolve on their own, with an average symptom duration of less than two weeks. [15]
Injuries to the hamstring in sport are quite common, especially in field- or running-based sports. For example, 19% of the injuries in men’s professional soccer over 21 seasons were classified as hamstring injuries. [16]
On the other hand, the risk of injury to the glutes, hamstrings, or elsewhere during exercise is relatively low. On average, most forms of resistance training have an injury rate of 2 to 4 injuries/1000 hours. [17] The majority of injuries observed in resistance training are not catastrophic, in that they do not require specialized care and spontaneously resolve on their own, with an average symptom duration of less than two weeks. [18]
The good news is that if you get your training right, these two cooperating muscles can reap the benefits and grow together. And doing this is easier than you may think. There are just a few key factors that should be considered, which we will now explore in greater detail.
Proper Technique
Exercise technique is the way an individual coordinates their body as they perform an activity or movement, though categorizing technique as “good” or “bad” is hard to do. One of the only definitions of good technique comes from a 2009 systematic review of resistance training safety, which said:
“Proper technique includes performing the exercise with the correct speed and resistance in the appropriate plane of movement and within the optimal joint range of motion to maximize adaptations and minimize risk of injury.” [19]
This definition of proper technique is an example of circular reasoning, as it concludes that proper technique minimizes risk of injury and maximizes adaptations because any technique that does that must be proper. This would be true if the premises that specific velocities, loads, movement planes, and ranges of motion reduce injury risk were supported by evidence, however this is not the case.
Using movement velocity as an example, the injury rates are quite similar in barbell sports using both high and low velocity, e.g. Olympic weightlifting and powerlifting competitors, which both average less than a handful of injuries per 1000 hours of training. Additionally, Olympic weightlifters (high velocity) report 1.0-1.7 injuries per athlete per year, respectively, whereas bodybuilders (low velocity) have 0.3-1.8 injuries per athlete per year. [20]
More importantly, the provided definition for good technique isn’t actionable. We’d prefer to use a description of technique that helps an individual identify and work towards a movement strategy that is well-suited to the task being performed and their current abilities. In other words, technique should be repeatable, efficient, and meet the points of performance of the exercise. We call this the REP Model of technique:
The REP Model
» Repeatable: The individual should perform the exercise in a way where the ROM, joint angles, velocity, tempo, and overall movement patterns are somewhat similar from rep to rep. Individuals move differently from one another and, when the analysis is constrained to a single person, from rep to rep. [21-23] Thus, we accept some rep-to-rep variability, though ROM, joint angles, velocity, and tempo should be fairly similar.
» Efficient: The movement strategy used should aim to maximize performance for a given level of energy and effort. In other words, an individual should aim for a technique that minimizes muscular force that does not contribute to the completion of the task. Using the deadlift as an example, starting with the bar forward of the lifter’s center of balance (approximately midfoot) requires muscular force production to move the bar back to the position it needs to be in, which costs energy and does not contribute to the bar being lifted.
» Points of Performance: The resulting movement strategy adopted by the individual should meet any pre-specified criteria or goals of the exercise, e.g. a particular range of motion, velocity, tempo, muscle group contraction, etc. For barbell sports like Olympic weightlifting and powerlifting, many exercises that are trained have competition-specific criteria that serve as points of performance. For general strength and conditioning, these criteria can be used, though they can just as easily be modified. Determining the intent of an exercise, e.g. what are we trying to train and why, is a concept that might be useful for determining useful points of performance.
This model intentionally avoids advocating for specific anatomical relationships, e.g. “knees not behind the toes” or “maintaining neutral spine”, as many tasks in both life and sport demand these positions. Furthermore, these positions do not appear to be uniquely risky independent of dosing, e.g. the load, volume, and frequency they’re performed. Some individuals will not be able to comfortably adopt the specific positions required for a given task without training, but that is more indicative of a deficit in current ability rather than a uniquely harmful anatomical relationship.
It should also be noted that while some aspects of technique can be applied to most people, e.g. maintaining balance, individuals are likely to have some differences in how they complete a task most efficiently. These differences are likely to change over time along with the individual’s strengths, weaknesses, and movement preferences.
Use the Right Amount of Resistance
As noted in the section about our favorite exercises above, we prefer choosing weights that produce the correct effort level (as measured by RPE or RIR) within a particular repetition range. This ensures that the effort is hard enough to drive adaptations like strength and hypertrophy, but not so difficult that it causes too much fatigue.
As an individual becomes more and more fit from training, they’ll be able to increase the amount of repetitions completed in each set. Then, upon maxing out the repetition range, the individual should add weight to the bar, usually 2.5 to 5 pounds at a time. Both of these strategies are part of progressive loading, which helps ensure the training being done is hard enough, but not too hard, for the individual.
Avoid Overtraining
Overtraining syndrome is characterized by reduced performance lasting several weeks to months due to high levels of exercise. [24] By contrast, periods of training with increased demand are often referred to as cycles of “planned overreaching, where a performance increases shortly thereafter (functional overreaching) or short-term decreases in performance lasting days to weeks (non-functional overreaching).
While this is still an active area of research, it appears that overtraining syndrome is pretty rare and hard to do in resistance training. [25] For example, one study had powerlifters max out their squat every day for a month, and guess what happened? All of their squats improved. [26]
The point isn’t that you should max out every day in order to make the best progress, but rather that overtraining probably shouldn’t be high on your list of concerns. Rather, matching the training stress to your current fitness levels and needs should take precedence.
Engage in Eccentric Training
Eccentric training is an exercise method that involves muscle lengthening, e.g. an eccentric contraction. It’s involved in most exercises and, when paired with a concentric (muscle shortening) contraction, is the ideal way to train for strength and size. All of the exercises listed in this article have an eccentric phase.
Quick Recap
Training the glutes and hamstrings together is not only easy but also extremely beneficial. Apart from aesthetic enhancements, it could also improve overall strength and athletic performance.
In this article, we’ve gone over some key exercises that can help you achieve your strength and hypertrophy goals in your glutes and hamstrings. Here’s a quick recap of them:
- Squats
- Deadlifts
- Hip Thrusts
- Romanian Deadlifts
- Step-up
- Split Squat
- Hamstring Curls
- Hip Extensions
We’ve got a few tips for those who would like help dealing with an injury:
- Don’t let injuries scare you. While they may be common for certain muscle groups, resistance training is a safe form of exercise, and the risk of injury is quite low overall.
- If you feel an alarming amount of pain during a workout, stop exercising immediately. However, you should not confuse injury-related pains with the burn you feel from the workout, as those are two different things. If you need help identifying an injury or information on how to deal with it, checking out our article on pain in training could be useful.
- If you’re already dealing with pain or a persistent injury, consider getting in touch with us. Our coaching team includes licensed physicians and rehab specialists who can help you get back on track as soon as possible.
References:
- Myer, G. D., Kushner, A. M., Brent, J. L., Schoenfeld, B. J., Hugentobler, J., Lloyd, R. S., Vermeil, A., Chu, D. A., Harbin, J., & McGill, S. M. (2014). The back squat: A proposed assessment of functional deficits and technical factors that limit performance. Strength and conditioning journal, 36(6), 4–27.
https://doi.org/10.1519/SSC.0000000000000103 - Del Vecchio, Luke. (2018). The health and performance benefits of the squat, deadlift, and bench press. MOJ Yoga & Physical Therapy. 3. 10.15406/mojypt.2018.03.00042.
- Martín-Fuentes, I., Oliva-Lozano, J. M., & Muyor, J. M. (2020). Electromyographic activity in deadlift exercise and its variants. A systematic review. PloS one, 15(2), e0229507. https://doi.org/10.1371/journal.pone.0229507
- Contreras, Bret & Cronin, John & Schoenfeld, Brad. (2011). Barbell Hip Thrust. Strength & Conditioning Journal. 33. 58-61. 10.1519/SSC.0b013e31822fa09d.
- Delgado J, Drinkwater EJ, Banyard HG, Haff GG, Nosaka K. Comparison between back squat, Romanian deadlift, and barbell hip thrust for leg and hip muscle activities during hip extension. J Strength Cond Res. 2019;33(10):2595-2601. doi:10.1519/jsc.0000000000003290
- Martín-Fuentes, I., Oliva-Lozano, J. M., & Muyor, J. M. (2020). Electromyographic activity in deadlift exercise and its variants. A systematic review. PloS one, 15(2), e0229507. https://doi.org/10.1371/journal.pone.0229507
- Neto, W. K., Soares, E. G., Vieira, T. L., Aguiar, R., Chola, T. A., Sampaio, V. L., & Gama, E. F. (2020). Gluteus Maximus Activation during Common Strength and Hypertrophy Exercises: A Systematic Review. Journal of sports science & medicine, 19(1), 195–203.
- Marchetti, P. H., Guiselini, M. A., da Silva, J. J., Tucker, R., Behm, D. G., & Brown, L. E. (2018). Balance and Lower Limb Muscle Activation between In-Line and Traditional Lunge Exercises. Journal of human kinetics, 62, 15–22. https://doi.org/10.1515/hukin-2017-0174
- Arakawa, Hiroshi & Mori, Miyuki & Tanimoto, Michiya. (2022). Greater Hip Moments in Rear-Foot-Elevated Split Squats Than in Conventional Back Squats With the Same Relative Intensity of Loads. Journal of Strength and Conditioning Research. Publish Ahead of Print. 10.1519/JSC.0000000000004351.
- Maeo, Sumiaki & Meng, Huang & Yuhang, Wu & Sakurai, Hikaru & Kusagawa, Yuki & Sugiyama, Takashi & Kanehisa, Hiroaki & Isaka, Tadao. (2020). Greater Hamstrings Muscle Hypertrophy but Similar Damage Protection after Training at Long versus Short Muscle Lengths. Medicine & Science in Sports & Exercise. 10.1249/mss.0000000000002523.
- Plotkin, D. L., Rodas, M. A., Vigotsky, A. D., McIntosh, M. C., Breeze, E., Ubrik, R., Robitzsch, C., Agyin-Birikorang, A., Mattingly, M. L., Michel, J. M., Kontos, N. J., Frugé, A. D., Wilburn, C. M., Weimar, W. H., Bashir, A., Beyers, R. J., Henselmans, M., Contreras, B. M., & Roberts, M. D. (2023). Hip thrust and back squat training elicit similar gluteus muscle hypertrophy and transfer similarly to the deadlift. bioRxiv : the preprint server for biology, 2023.06.21.545949. https://doi.org/10.1101/2023.06.21.545949
- Vigotsky, A. D., Halperin, I., Lehman, G. J., Trajano, G. S., & Vieira, T. M. (2018). Interpreting Signal Amplitudes in Surface Electromyography Studies in Sport and Rehabilitation Sciences. Frontiers in physiology, 8, 985. https://doi.org/10.3389/fphys.2017.00985
- Buckthorpe, M., Stride, M., & Villa, F. D. (2019). ASSESSING AND TREATING GLUTEUS MAXIMUS WEAKNESS – A CLINICAL COMMENTARY. International journal of sports physical therapy, 14(4), 655–669.
- Buckthorpe, M., Stride, M., & Villa, F. D. (2019). ASSESSING AND TREATING GLUTEUS MAXIMUS WEAKNESS – A CLINICAL COMMENTARY. International journal of sports physical therapy, 14(4), 655–669.
- Naoto Matsunaga, Yu Okubo, Shunto Isagawa, Jyunpei Niitsuma, Takahiro Otsudo, Yutaka Sawada, Kiyokazu Akasaka, Muscle fatigue in the gluteus maximus changes muscle synergies during single-leg landing, Journal of Bodywork and Movement Therapies, Volume 27, 2021, Pages 493-499, ISSN 1360-8592,
https://doi.org/10.1016/j.jbmt.2021.05.013.
- Keogh, J. W., & Winwood, P. W. (2017). The Epidemiology of Injuries Across the Weight-Training Sports. Sports medicine (Auckland, N.Z.), 47(3), 479–501. https://doi.org/10.1007/s40279-016-0575-0
- Raske, A., & Norlin, R. (2002). Injury incidence and prevalence among elite weight and power lifters. The American journal of sports medicine, 30(2), 248–256. https://doi.org/10.1177/03635465020300021701
- Juan C. Colado & Xavier García-Massó (2009) Technique and Safety Aspects of Resistance Exercises: A Systematic Review of the Literature, The Physician and Sportsmedicine, 37:2, 104-111, DOI: 10.3810/psm.2009.06.1716
- Keogh, Justin W L, and Paul W Winwood. “The Epidemiology of Injuries Across the Weight-Training Sports.” Sports medicine (Auckland, N.Z.) vol. 47,3 (2017): 479-501. doi:10.1007/s40279-016-0575-0
- Bartlett, Roger et al. “Is movement variability important for sports biomechanists?.” Sports biomechanics vol. 6,2 (2007): 224-43. doi:10.1080/14763140701322994
- Nordin, Andrew D, and Janet S Dufek. “Load Accommodation Strategies and Movement Variability in Single-Leg Landing.” Journal of applied biomechanics vol. 33,4 (2017): 241-247. doi:10.1123/jab.2016-0097
- Meeusen, R., Duclos, M., Gleeson, M., Rietjens, G., Steinacker, J. and Urhausen, A. (2006), Prevention, diagnosis and treatment of the Overtraining Syndrome. European Journal of Sport Science, 6: 1-14. https://doi.org/10.1080/17461390600617717
- Grandou, C., Wallace, L., Impellizzeri, F. M., Allen, N. G., & Coutts, A. J. (2020). Overtraining in Resistance Exercise: An Exploratory Systematic Review and Methodological Appraisal of the Literature. Sports medicine (Auckland, N.Z.), 50(4), 815–828. https://doi.org/10.1007/s40279-019-01242-2
- Zourdos, M. C., Dolan, C., Quiles, J. M., Klemp, A., Jo, E., Loenneke, J. P., Blanco, R., & Whitehurst, M. (2016). Efficacy of daily one-repetition maximum training in well-trained powerlifters and weightlifters: A case series. *Nutrición Hospitalaria, 33*(2). https://doi.org/10.20960/nh.267